外观
截止目前,已经将vue-router的整个源码根据其暴露的API分析了一遍,现在我们通过实例将整个过程组合起来,加深对vue-router的理解。
首先规定我们的路由表:
ts
const routes = [
  {
    path: '/',
    redirect: '/home',
  },
  {
    path: '/home',
    components: {
      default: Home,
      other: Other
    },
    children: [
      {
        path: 'child',
        component: Child
      }
    ]
  },
  {
    path: '/:data(.*)',
    component: NotFound,
    name: 'NotFound'
  },
]
html
<!-- Home -->
<template>
  <div>Home</div>
  <RouterView />
</template>

<!-- Other -->
<template>
  <div>Other</div>
</template>

<!-- Child -->
<template>
  <div>Child</div>
</template>

<!-- NotFound -->
<template>
  <div>NotFound</div>
</template>

<!-- App -->
<template>
  <div>root</div>
  <router-link class="link" to="/">/</router-link>
  <router-link class="link" to="/home">/home</router-link>
  <router-link class="link" to="/home/child">/home/child</router-link>
  <router-link class="link" to="/xxx">/xxx</router-link>
  <router-view name="default" />
  <br />
  <router-view name="other" />
</template>
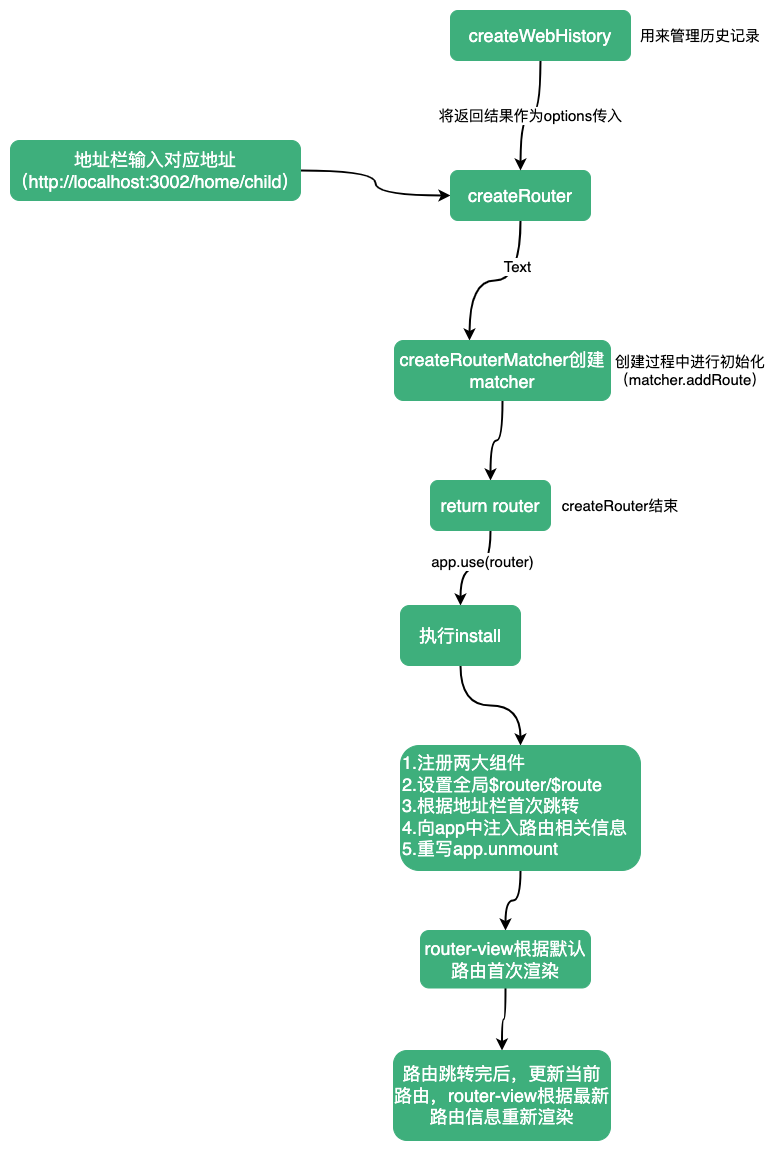
现在我们访问http://localhost:3002/home/child,并观察其执行过程。
首先需要使用createWebHistory/createWebHashHistory/createMemoryHistory之一创建一个history。history的作用是用来保存路由跳转过程中历史记录,在创建history的过程中会添加两个监听事件popstate、beforeunload,一旦历史记录发生变化,触发popstate事件,beforeunload的作用是在页面关闭或刷新时,记录页面的滚动位置。
然后执行createRouter方法,创建一个router。在createRouter中还会创建一个routerMatcher,大部分路由操作都依靠routerMatcher,routerMatcher中通过一个数组和Map维护,数组和Map中存储的一些路由信息,这些信息包括路径的正则表达式、路径的分数、经过标准化的路由信息等信息。在创建routerMatcher的过程中添加路由表(matcher.addRoute)。 然后在createRouter最后声明一个router对象,将其返回。router中包含了供用户使用的大部分API。此时createRouter执行完毕。
因为我们声明router后,会调用app.use(router)。在use方法中会执行router.install(app)。在install的过程中会做几件比较重要的事:
- 注册
RouterLink、RouterView组件 - 设置全局属性
$router、$route - 根据地址栏进行首次的路由跳转
- 向
app中注入一些路由相关信息,如路由实例、响应式的当前路由信息对象 - 拦截
app.unmount方法,在卸载之前重置一些属性、删除一些监听函数
执行完install后,App.vue中的router-view开始首次渲染,因为此时currentRoute是默认的(START_LOCATION_NORMALIZED),所以第一次渲染是空的。(依次App.vue router-view(default)=>App.vue router-view(other))
当install中的第一次跳转完成后,currentRoute发生变化,App.vue中的router-view开始第二次渲染,name为default的router-view首先渲染为Home,紧接着Home中的router-view开始首次渲染,这次渲染可以直接从currentRoute中获取到需要渲染的组件,所以Home中的router-view首次渲染就得到了匹配的路由组件。当Home渲染完,接着App.vue中name为other的router-view会接着完成渲染。
至此,整个流程完毕。